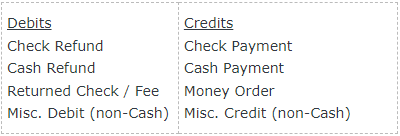
While UltraCamp has the most common types of transactions already built in to the system, your organization may want to add additional transaction types. Custom Transactions allow you to create your own option which will be available to your admins for use on account finances.
The default transaction types are:

To add or edit Custom Transactions, take the following steps:
- Go the Settings menu and expand the Accounting section
- Click Custom Transaction Templates
- Click Create a Custom Transaction Type or the edit icon to the right of an existing type
Custom Transaction Settings
To create a Custom Transaction, you'll need to enter the appropriate settings.
The Transaction Name will display to clients on their financial history and statements as well as in your reporting.
The Debit / Credit setting determines how this transaction will impact account finances.
You can set an Allocation Account Code for the transaction type, but this will drastically impact financial reporting and should be done with caution. The Allocation number you set here will override the application of your cash number to the items this transaction is paying for. Only use this if you absolutely need to track your custom transaction separately.
By default, all transactions in UltraCamp count towards Cash, except for the built-in Misc Debit and Misc Credit transaction types. You can specify this transaction type as a Non-cash Transaction by checking the box.
Checking the Enabled box makes this custom transaction an active option for your admins.
Comments
Please sign in to leave a comment.